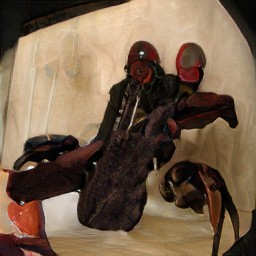
so we all know and love old artbreeder with its weird indeterminate images. but the freaks who know machine learning want to put those days behind in exchange for stuff like txt2img and high res stuff. to each their own, it's pretty cool that we can do all that shit, but what really pisses me off is that no one writing about how to generate images locally seems to give a shit about the crusty 256px images of the distant early 2020s.
for the record, the model being used here, biggan, was trained on imagenet, which was scraped from image searches for nouns on wordnet. it's overall a different beast than the models that are more popular now like stable diffusion.
well, so what is this? this is my tutorial on how to run artbreeder's open source ancestor, ganbreeder, on your own silicon. it's not quite identical to legacy artbreeder, and you can't pick or manipulate genes directly, but you can breed images just fine, and should be able to do so indefinitely and entirely offline. nothing will change without your direct intervention. it's secret horse world forever (sort of; neuralblender used a different model).
who is this for? well, you need pretty average hardware — i'm using an acer aspire 5, which is a circa 2020 laptop with an 11th gen i5 cpu and an nvidia mx350 gpu that i'm pretty sure doesn't even get poked. hell, this ran just fine on my 2013 thinkpad t440, generating a batch in around 40 seconds. the tutorial assumes some vague familiarity with the command line and everything has only been tested on linux, but i'm pretty sure you can figure it out just fine from here, because you should have specific and easily duckduckgoable problems. it's at the very least a step up from joel's spartan and somewhat confusing readme. also you don't have to know shit about git or docker or node or even python, so don't worry. you can get this up and running in a leisurely afternoon.
i've been meaning to try self hosting a gan for years now (at least since working on technobiogenesis in 2023, probably earlier), but by the time i actually tried getting ganbreeder to work, dependencies were all out of wack. python is a very sensitive beast. the big problem here is tensorflow: joel's original project requires a version that in turn requires python 3.6, which is ancient and hard to deal with (nebulous explanation; never forget that i do not know python). my solution? changing tensorflow and tensorflow-hub to 1.15.5 and 0.11.0 respectively, which work under python 3.7, a version that's also deprecated but plays much much nicer. i also added a downgrade to protobuf after getting errors.
this new and more-or-less improved ganbreeder server is right here as a fork on github, which you may clone instead of joel's original and is what i'm referencing throughout this guide, but you can just make these same changes to gan_server/requirements.txt:
Flask>=1.0.2
Flask-Cors>=3.0.7
tensorflow==1.15.5
tensorflow-hub==0.11.0
scipy>=1.1.0
Pillow>=5.3.0
protobuf==3.20.1
that's a bit of a cart before the horse situation though; let's start on the guide proper.
well first of all you need your files. clone either the original repo or my fork somewhere. if that doesn't mean anything to you, and you don't wanna install git (it's very easy though), i recommend choosing my fork; then click on the big green code button and download zip, then unzip it somewhere.
this is what isn't clear from the readme: there are two ways to go about hosting ganbreeder. there's the "manual" route where you presumably can modify more things, and the docker route where you run a ready-made image that should work out of the box with less effort. i went the manual way because i didn't realize the possibility of docker... yes i'm embarassed. in any case, you can just try both of them (though you may run into some issues with ports already being in use, that's easy to fix though). skip to venv or read on for docker.
we'll be on the command line for everything.
for this, besides docker you'll also need docker-compose. and this is crazy simple (apparently especially if you're on linux).
i'll be honest kittens, i think i fucked something up horrendously here because it works on my main machine, which i used for testing all this, but it did nawt work on the thinkpad. i'm looking into it as we speak. i think it has to do with the whole manual setup having been done? i don't knowwwww... will keep you updated.
docker-compose up starts the containers, that already have everything setup and dependencies dealt with.docker-compose exec server node make_randoms.js to generate images for you to work with. then docker-compose restart server to restart the frontend and display said images.you can now navigate to http://localhost:8888/ to use your very own ganbreeder.
skip to step 4 if you're not interested in the manual setup.
for this, you'll need to have python installed. if you don't already have it, just grab the latest version. after that, we'll also use uv, which is a package manager. i'm not sure that it is vital, but i have it and it's very practical.
with both of these, navigate to your ganbreeder folder. we'll create a virtual environment — a little vivarium just for this project — because python is very particular about versions and shit like that. from there, we follow the readme to start up the backend (that's what's generating the images):
uv venv --python 3.7 creates the virtual environment. you only do this once.cd gan_server is gonna put you in the proper directory.uv pip install -r requirements.txt. make sure it's updated version, either from my fork or from changing the original yourself. this will install the required dependencies. you only do this the first time.python server.py starts the server.going to http://localhost:5000/ on your browser should give you a page with "hello world" in it!
now to actually interact with the generator, you'll need a frontend. you'll need docker to configure it, and node (with npm) to actually launch it. these sites look kinda cluttered and overwhelming but i have faith in you.
to configure, i just used the example command. you'll need to open a new shell window, since the server is running on the previous one. all of this is done just once.
docker run -p 5432:5432 --name ganbreederpostgres -e POSTGRES_PASSWORD=ganbreederpostgres -d postgres is creating a database with the user "postgres" and password "ganbreederpostgres". if you have reason to change this stuff i trust you don't really need my guide. because i can't really think of one...server/example_secrets.js named just secrets.js and add that info to it. that's because the secrets file is ignored by git, so you don't expose sensitive information like the password, and i didn't want to change that on my fork...database and user to 'postgres', and password to 'ganbreederpostgres' — or whatever else you configured in docker.and now we just have to launch it! i don't know anything about node, so this is a very copy-pasted explanation. most of this is one-time only too. i found i needed to sudo all of this... if you're running into errors about permissions, you'll need to do something equivalent. or better yet, get your permissions fixed. should be a single stackoverflow question away.
cd server. you know what this means by now. it stands for change directory.npm install uses the node package manager to install dependencies. it might throw a little fit about how things are deprecated (get used to that) and there's a bunch of vulnerabilities. run npm audit fix to autofix what you can, and ignore the rest — don't force it, who knows what might break. it's fine, you're not exposing this to the internet. and if you are, i assume you know more than me.node_modules/knex/bin/cli.js migrate:latest "creates the database structure". i looked this up and i truly have no clue.node make_randoms.js generates some images to start you off.node updatecache.js updates the front page.node server.js starts the server.you can now navigate to http://localhost:8888/ to use your very own ganbreeder.
finally, once you're done using ganbreeder, just ctrl + c to stop the processes on your shell window(s). and run deactivate to exit your venv, if you're using it.
so now you should have everything working as if it were november 2018. mixing images works exactly as you'd expect. you can star images and they'll remain starred even after you close the server and reboot your computer too.
you can also customize the ui. it took me a bit to find the files, because there's no .html in sight, but the .pug files under server/public are responsible for the pages, and there's an index.css. my fork doesn't mess with these much, i just removed some stuff like mailchimp and google analytics since it's useless, added a link to the starred images right from the homepage, and changed text (including a typo fix lol) to have info on the fork. but have your fun.
as you'll have noticed if you opened the brains of the operation, gan_server/server.py, ganbreeder is fetching the biggan generator from tfhub (now kaggle). which is fine but we can go 100% offline by just downloading the .tar (around 600mb)!
now, i'm kinda unsure what's the best practice here. but i personally created a folder called models inside gan_server, and unzipped (untarred?) the model in there. then i went to server.py and changed module_path from the url to ./models/biggan-tensorflow1-256-v2. i didn't get any results from replacing the model with its 512 version though, probably because the image dimensions are hardcoded? that's a vector of experimentation for you.
ok now go forth and have fun! you can email me at solflo [at] pm [dot] me if you have any questions or tips or things to add etc etc. i can't guarantee i'll be able to answer your questions though... i rely a lot on stackoverflow...